

Once your India e-Visa is approved, you must download the Electronic Travel Authorization (ETA) and print it before your trip. The ETA is the document immigration officers check at the Indian airport – without a printed copy, you may be denied boarding or entry. This guide walks you through exactly how to download, save, and print your India e-Visa ETA in under five minutes.
What Is the India e-Visa ETA?
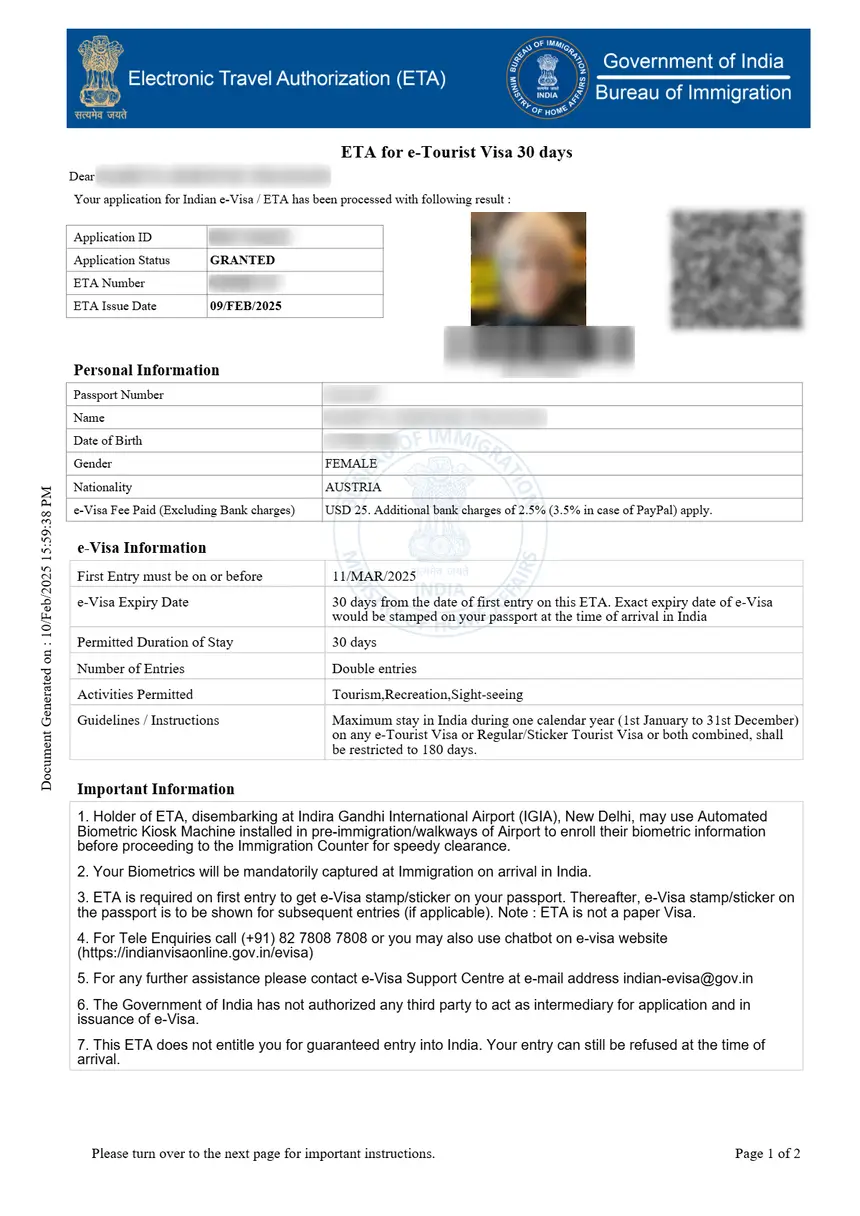
The Electronic Travel Authorization (ETA) is the official approval document issued by the Bureau of Immigration, Government of India, once your e-Visa application is approved. It is sometimes called the “e-Visa printout” or “visa grant notice.”
Your ETA contains:
- Your full name and passport number
- Visa category (e-Tourist, e-Business, e-Medical, etc.)
- Validity period and number of entries allowed
- Port of arrival (any of 28 designated airports and 5 seaports)
- A unique ETA number for verification
The ETA is not the same as your e-Visa application receipt. If you are still waiting for approval, check our guide on India e-Visa processing time for expected timelines.
How to Download Your India e-Visa ETA
There are two official methods to download your approved e-Visa ETA.
Method 1: Check Status & Download (Recommended)
- Visit the official portal: indianvisaonline.gov.in
- Click “Check your Visa Status” on the homepage
- Enter your Application ID (format: INDL followed by numbers) and your passport number
- Complete the CAPTCHA verification
- Click “Check Status”
- If approved, click the “Download ETA” or “Print ETA” button
- Save the PDF file to your device
Method 2: Via Email
After approval, the Indian Bureau of Immigration sends the ETA to the email address you provided during your e-Visa application. To retrieve it:
- Check your inbox (and spam/junk folder) for an email from [email protected]
- Open the email with the subject line containing “ETA” or “Visa Grant”
- Download the attached PDF
- If the email has a link instead, click it to access the download page
If you cannot find the email, Method 1 always works regardless of email delivery issues.
Step-by-Step: Download ETA from the Official Portal
Here is the detailed process with screenshots of each step:
Step 1: Navigate to the portal
Go to indianvisaonline.gov.in and look for the “Visa Status” link in the top navigation bar or on the homepage tiles.
Step 2: Enter your details
You need two pieces of information:
– Application ID – This was provided when you submitted your application (format: INDLXXXXXXXXXX)
– Passport Number – The passport you used in the application
Step 3: Complete the CAPTCHA
Enter the characters shown in the image. The CAPTCHA is case-sensitive.
Step 4: View and download
Once your status shows “Granted”, you will see a download option. Click it to save the ETA as a PDF document.
For a complete walkthrough of the application process from start to finish, see our India e-Visa complete guide.
How to Print Your India e-Visa ETA
Immigration authorities at Indian airports require a physical printed copy of your ETA. Digital copies on phones are not always accepted.
Printing Requirements
| Requirement | Details |
|---|---|
| Paper size | A4 or US Letter |
| Color | Color preferred, black-and-white accepted |
| Copies | Print at least 2 copies |
| Quality | Text must be fully legible |
| Photo | Your passport photo must be visible |
Printing Tips
- Print two copies – one for the airline check-in counter and one for Indian immigration
- Use a color printer if possible, as it makes the document easier to verify
- Do not fold or laminate the printed ETA
- Keep the ETA with your passport and boarding pass in the same travel folder
- Some airlines require the ETA at check-in before you even board your flight to India
What If You Do Not Have a Printer?
If you cannot print before reaching the airport, consider these options:
- Airport printing services – Many international airports have business centers or printing kiosks
- Hotel printer – Most hotels can print documents for guests
- Print shop – Local print shops or office supply stores near the airport
- Airline counter – Some airlines can access your ETA digitally, but this is not guaranteed
We strongly recommend printing before leaving home to avoid last-minute stress at the airport.
What Your Printed ETA Should Look Like
A correctly printed India e-Visa ETA will display:
- Header – “Government of India – Electronic Travel Authorization”
- Your photo – The passport-style photo you uploaded during application
- Personal details – Name (as on passport), nationality, date of birth, gender
- Passport information – Passport number, place of issue, date of issue and expiry
- Visa details – Type, duration, number of entries, validity dates
- ETA number – A unique reference number for verification
- QR code – Scannable by immigration officers for instant verification
- Instructions – Entry requirements and conditions
If any of these elements are missing or the print is unclear, re-download and reprint the document.
Common Problems When Downloading the ETA
“No Record Found” Error
This usually means:
– Your application is still under processing – wait 24-72 hours and try again
– You entered the wrong Application ID or passport number – double-check both
– The CAPTCHA was entered incorrectly – retry with careful typing
ETA Email Not Received
- Check your spam/junk folder – government emails sometimes get filtered
- Search your inbox for “indianvisaonline” or “ETA”
- Use Method 1 (portal download) as a reliable alternative
- Ensure the email address in your application was correct
Download Link Not Working
- Try a different browser (Chrome, Firefox, Edge)
- Clear your browser cache and cookies for indianvisaonline.gov.in
- Disable pop-up blockers – the ETA may open in a new window
- Try downloading from a different device
Wrong Information on ETA
If your name, passport number, or visa details are incorrect on the ETA, contact the Indian Bureau of Immigration immediately. Do not travel with an ETA that has errors – you may be refused entry. For details on filling the application correctly, see our visa application form guide.
When to Download Your ETA
Download your ETA as soon as you receive the approval notification. Do not wait until your travel date because:
- You need time to verify all details are correct
- You need to print the document before your flight
- Airlines may require the ETA during online check-in
- If there is an error, you need time to get it corrected
If you are applying from the United States, our India e-Visa from USA guide has additional tips on timing your application and download.
Frequently Asked Questions About Downloading India e-Visa
Can I show the e-Visa on my phone instead of printing it?
While some travelers have been allowed through with a digital copy, Indian immigration officially requires a printed copy of the ETA. Airlines at your departure airport may also require a printed version before issuing a boarding pass. Always carry a printed copy to avoid issues.
How many copies of the ETA should I print?
Print at least two copies – one for the airline check-in counter (some carriers require it) and one for Indian immigration at arrival. Having a third copy as a backup in your carry-on is also a good idea.
What format is the downloaded ETA in?
The ETA downloads as a PDF file. You can open it with any PDF reader (Adobe Acrobat, browser, or mobile PDF viewer) and print it from there.
Can someone else download my ETA for me?
Yes, anyone with your Application ID and passport number can check the status and download the ETA from the official portal. This is useful if a family member or travel agent needs to print it on your behalf.
What if my ETA has expired?
The ETA is valid only within the visa’s validity period. If your ETA has expired, you must submit a new e-Visa application through the official portal. You cannot download or reuse an expired ETA.
Do I need to print the ETA in color?
Color printing is preferred but not strictly required. Black-and-white prints are accepted as long as all text, your photo, and the QR code are clearly visible and legible.
My download keeps failing – what should I do?
Try clearing your browser cache, disabling pop-up blockers, or using a different browser. If the problem persists, try again in a few hours as the server may be experiencing high traffic. You can always use the email method as a backup.
Do children need a printed ETA too?
Yes, every traveler including children and infants must have their own printed ETA. Each ETA is tied to an individual passport and must be presented separately at immigration.
What to Do After Downloading Your ETA
After you download and print your ETA, take these final steps before your trip:
- Verify every detail – Check your name spelling, passport number, visa dates, and visa type against your actual passport
- Store digitally – Save the PDF to your phone, email it to yourself, and store it in cloud storage (Google Drive, iCloud) for backup
- Organize your travel folder – Keep the printed ETA, passport, and boarding passes together
- Check visa conditions – Note the validity period, number of entries, and allowed ports of entry
- Review entry requirements – Your ETA is one part of the entry process; you still need a valid passport with at least 6 months validity and 2 blank pages
Which Ports Accept the e-Visa ETA?
Your printed ETA is valid at 28 designated airports and 5 seaports in India.
Major airports accepting e-Visa:
| Airport | Code | City |
|---|---|---|
| Indira Gandhi International | DEL | New Delhi |
| Chhatrapati Shivaji Maharaj | BOM | Mumbai |
| Kempegowda International | BLR | Bengaluru |
| Chennai International | MAA | Chennai |
| Netaji Subhas Chandra Bose | CCU | Kolkata |
| Rajiv Gandhi International | HYD | Hyderabad |
| Cochin International | COK | Kochi |
| Sardar Vallabhbhai Patel | AMD | Ahmedabad |
| Trivandrum International | TRV | Thiruvananthapuram |
| Goa International (Dabolim) | GOI | Goa |
| Jaipur International | JAI | Jaipur |
| Lucknow International | LKO | Lucknow |
You must enter India through one of these designated ports. If your travel plans change and you need to enter through a different point, you may need a regular visa instead.
e-Visa ETA vs Regular Visa: Key Differences
| Feature | e-Visa ETA | Regular Visa |
|---|---|---|
| How obtained | Online application | Embassy/consulate visit |
| Document format | Digital PDF (must print) | Stamp in passport |
| Processing time | 72 hours | 5-15 business days |
| Entry points | 28 airports + 5 seaports | All ports of entry |
| Cost (US citizens) | $10-$80 (by type) | $160 |
| Photo requirement | Digital upload | Physical photo |
| Maximum stay | Up to 180 days (business) | Varies by visa |
For a full comparison of all visa types, see our India visa types overview.