The Indian visa application form is a mandatory online document that every foreign traveler must complete before visiting India – getting it right the first time avoids delays, rejections, and extra costs. Whether you are applying for an e-Visa or a traditional sticker visa through an embassy, the form collects your personal details, passport information, travel plans, and supporting documents in a single submission.
Understanding each section of the form, the required format for uploads, and the most common mistakes applicants make will save you time and frustration. This guide walks you through every field on the Indian visa application form, explains how to fill each section correctly, and highlights the pitfalls that cause the most rejections.
What Is the Indian Visa Application Form?
The Indian visa application form is the official document used by the Government of India to collect biographical, travel, and security information from foreign nationals seeking entry. There are two main versions:
| Form Type | Who Uses It | Where to Apply |
|---|---|---|
| e-Visa Application Form | Citizens of 170+ eligible countries for short stays (tourism, business, medical, etc.) | indianvisaonline.gov.in |
| Regular (Sticker) Visa Application Form | All applicants, especially those not eligible for e-Visa or needing long-term visas | indianvisaonline.gov.in (printed and submitted to embassy/consulate) |
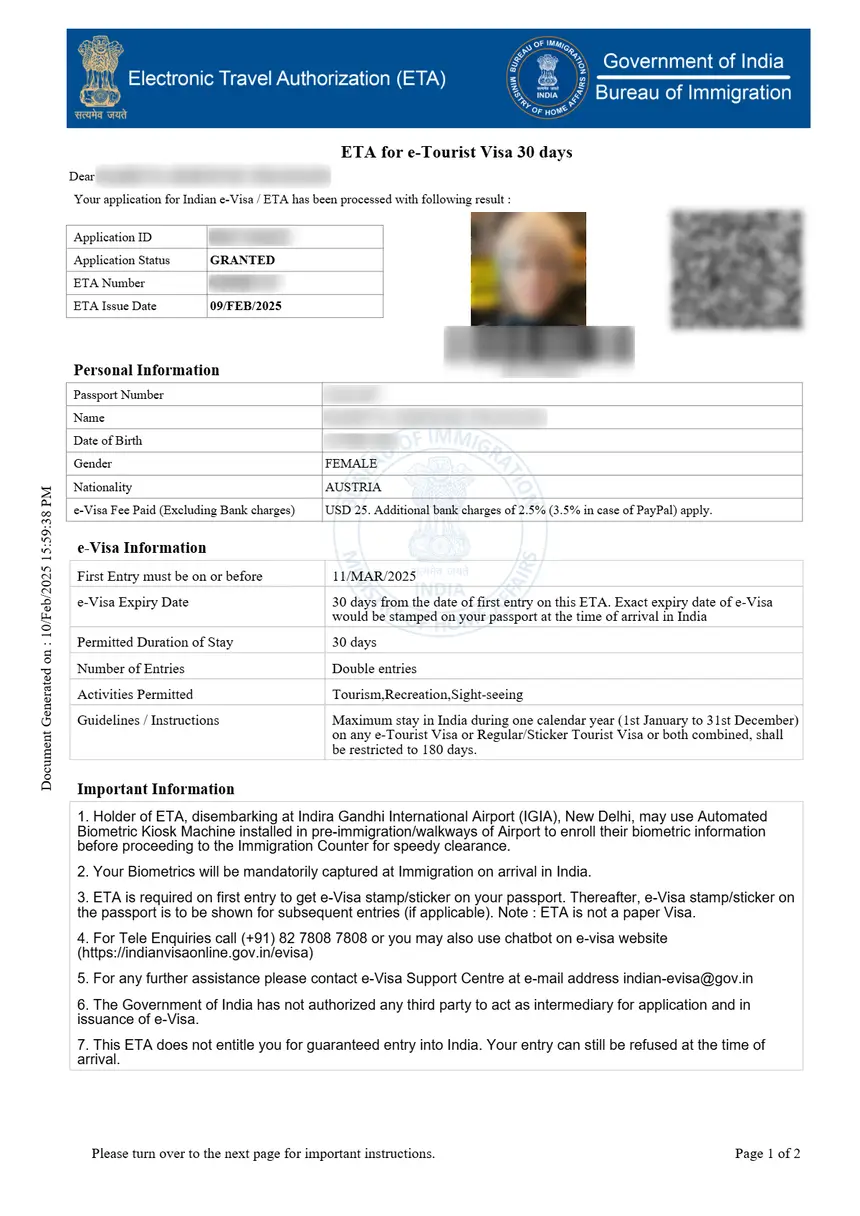
The e-Visa form is entirely online – you fill it out, upload documents, pay the fee, and receive an Electronic Travel Authorization (ETA) by email. The regular visa form is also initiated online but requires a printed copy to be submitted at an Indian embassy or visa application center.
Both forms are accessed through the same official portal: indianvisaonline.gov.in. This is the only legitimate government website for Indian visa applications. Third-party sites may charge extra service fees or collect your data without delivering a valid visa.
Step-by-Step Guide to Filling Out the e-Visa Application Form
The e-Visa application process on indianvisaonline.gov.in follows four main steps:
- Apply online – Fill out the form and upload your photo and passport page
- Pay the e-Visa fee online – Using a credit card, debit card, or payment wallet
- Receive your ETA by email – Electronic Travel Authorization sent to your registered email
- Fly to India – Print the ETA and present it at the immigration checkpoint where the e-Visa is stamped in your passport
To start, visit indianvisaonline.gov.in and click “Apply here for e-visa.” You will be asked to select your visa type and nationality first, then proceed to the main application form.
Saving a Partial Application
If you cannot complete the form in one sitting, you can save your progress and return later. Use the “Complete Partially Filled Application Form” tab at the bottom of the e-Visa main page. You will need your application ID and passport number to retrieve your saved form.
After submission, if any document or image does not meet specifications, you will receive an email within 24 hours asking you to re-upload. Use the “Reupload Data” tab on the main page to submit corrected files.
Personal Information Section
This is the first major section of the form. Every field must match your passport exactly – even small discrepancies can lead to rejection.
| Field | What to Enter | Common Mistakes |
|---|---|---|
| Surname / Family Name | Exactly as printed on your passport | Using a married name that differs from passport |
| Given Name / First Name | All given names as on passport | Including middle name in surname field |
| Date of Birth | DD/MM/YYYY format (day-month-year) | Using US format MM/DD/YYYY |
| Gender | Male / Female / Transgender | – |
| Town / City of Birth | As listed on passport or birth certificate | Leaving blank |
| Country of Birth | Country name at time of birth | Using current country name if borders changed |
| Citizenship / Nationality | Country of your passport | Dual citizens: use the passport you travel on |
| Religion | Optional but commonly asked | – |
| Visible Identification Marks | Scars, birthmarks, tattoos visible on face/neck | Writing “none” when marks exist |
| Educational Qualification | Highest level completed | – |
Critical tip: Your name on the application must be an exact character-for-character match with your passport. If your passport shows “John A. Smith,” do not write “John Andrew Smith” on the form. Abbreviations, middle initials, and suffixes must all match.
For a full breakdown of passport-specific requirements, see our India Visa Passport Requirements guide.
Passport Details Section
This section collects your passport information. The passport must be valid for at least six months from your date of arrival in India and have at least two blank pages for stamping.
| Field | What to Enter |
|---|---|
| Passport Number | Alphanumeric, exactly as on your passport bio page |
| Place of Issue | City/location shown on passport |
| Date of Issue | DD/MM/YYYY |
| Date of Expiry | DD/MM/YYYY |
| Any Other Passport / Identity Certificate | Yes/No – if you hold a second passport, enter details |
Important: Indian e-Visas are linked to the specific passport you apply with. If your passport expires or is renewed after you receive the e-Visa, you must apply for a new e-Visa with the new passport. You cannot travel on an ETA issued to an old passport number.
For complete passport validity rules and blank page requirements, see our India Visa Requirements guide.
Travel Details and Purpose of Visit
This section asks where you are going in India, why, and when. The information you provide here determines which visa sub-category you qualify for and how long your visa will be valid.
| Field | What to Enter |
|---|---|
| Purpose of Visit | Select from: Tourism, Business, Medical, Conference, etc. |
| Expected Date of Arrival | DD/MM/YYYY – must be at least 4 days from application date |
| Expected Port of Arrival | Select from 28 authorized airports and 5 seaports |
| Expected Port of Departure | Can be any authorized exit point |
| Places to Visit | List cities or regions you plan to visit |
| Duration of Stay | 30 days, 1 year, or 5 years (depends on visa type) |
| Number of Entries | Single, Double, or Multiple (depends on visa type) |
| Have You Visited India Before? | Yes/No – if yes, provide previous visa details |
| Countries Visited in Last 10 Years | List all countries visited |
| Reference in India | Name and address of hotel, contact person, or organization |
| Reference in Home Country | Name and address of a contact in your country |
Key rules by visa type:
- e-Tourist Visa: Apply minimum 4 days before arrival. Valid for 30 days (double entry), 1 year (multiple entry), or 5 years (multiple entry).
- e-Business Visa: Apply minimum 4 days before arrival. Valid for 1 year or 5 years with multiple entries. Requires a letter from the Indian company.
- e-Medical Visa: Apply minimum 4 days before arrival with a 120-day window. Valid for 60 days with triple entries. Requires a hospital letter.
- e-Conference Visa: Valid for 30 days with single entry. Requires an invitation from the conference organizer.
For details on which visa type suits your trip, see our India Visa Types overview.
Photo and Document Upload Requirements
The upload section is where most applications get flagged or rejected. The Indian government has strict specifications for both the photograph and the passport scan.
Photo Requirements
| Specification | Requirement |
|---|---|
| Format | JPEG |
| File Size | Minimum 10 KB, Maximum 1 MB |
| Dimensions | 350 x 350 pixels (square) minimum |
| Background | Plain white |
| Face Coverage | 70-80% of the frame |
| Expression | Neutral, eyes open, mouth closed |
| Glasses | No prescription glasses or sunglasses |
| Head Coverings | Only for religious reasons; face must be fully visible |
| Recency | Taken within the last 6 months |
Passport Bio Page Requirements
| Specification | Requirement |
|---|---|
| Format | |
| File Size | Minimum 10 KB, Maximum 300 KB |
| Content | Full passport bio page with photo, MRZ lines, and all text clearly readable |
| Quality | Color scan, no glare, no cropping of edges |
Additional Documents (by Visa Type)
- e-Business Visa: Letter from the Indian organization on company letterhead
- e-Medical Visa: Letter from a recognized Indian hospital confirming treatment plan
- e-Conference Visa: Invitation letter from the conference organizer
For complete photo specifications, see our India Visa Photo Requirements guide.
Payment and Submission
After completing all fields and uploading your documents, you will proceed to payment. The e-Visa fee depends on your nationality and the visa duration you selected.
| e-Visa Type | Fee (US Citizens) | Processing Fee |
|---|---|---|
| 30-Day e-Tourist Visa | $25 | 2.5% bank surcharge |
| 1-Year e-Tourist Visa | $40 | 2.5% bank surcharge |
| 5-Year e-Tourist Visa | $80 | 2.5% bank surcharge |
| e-Business Visa | $80 | 2.5% bank surcharge |
| e-Medical Visa | $25 | 2.5% bank surcharge |
Payment is accepted via credit card, debit card, or payment wallet. The Government of India does not charge any emergency or express processing fees – if a website asks for extra fees to “expedite” your application, it is not the official portal.
After successful payment, you will receive a confirmation email. Your ETA (Electronic Travel Authorization) is typically delivered within 72 hours, though many applicants receive it within 24-48 hours. Print the ETA and carry it with your passport when traveling to India.
Common Mistakes to Avoid
The following errors cause the most visa application rejections and delays:
-
Name mismatch between form and passport – Even a single character difference can trigger rejection. Copy your name exactly from the passport bio page.
-
Wrong date format – The form uses DD/MM/YYYY (day/month/year). Applicants from the US often enter dates in MM/DD/YYYY format, which can result in an invalid arrival date.
-
Poor quality photo upload – Blurry photos, wrong background color, or photos with glasses are automatically flagged. Use a professional passport photo service.
-
Passport scan not readable – Glare, shadows, or cropped MRZ lines will cause rejection. Scan in color at a resolution that keeps file size under 300 KB while maintaining legibility.
-
Applying too late – The minimum lead time is 4 days before arrival. Apply at least 1-2 weeks in advance to allow time for corrections if documents are flagged.
-
Using the wrong passport – If you hold dual citizenship, the passport you use on the form must be the same one you will carry to India. The e-Visa is linked to a specific passport number.
-
Selecting the wrong visa type – Choosing “Tourist” when your purpose is business, or vice versa, can lead to denial at immigration even if the e-Visa is approved.
-
Incomplete travel details – Leaving the “Reference in India” field blank or writing “N/A” instead of providing a hotel name and address.
FAQs About the Indian Visa Application Form
Can I fill out the Indian visa application form on my phone?
Yes, the indianvisaonline.gov.in portal is compatible with Android and iOS devices. However, uploading documents and photos is easier on a desktop or laptop with a stable internet connection.
What if I make a mistake on my submitted application?
Once submitted, you cannot edit the form directly. If the government identifies an issue with your uploaded documents, you will receive an email within 24 hours and can re-upload corrected files. For errors in personal details, you may need to submit a new application and pay the fee again.
How long does it take to get the Indian e-Visa after applying?
Processing typically takes 24-72 hours. The government advises applying at least 4 days before your intended arrival date. Many applicants report receiving their ETA within 24 hours.
Do I need to print the e-Visa or can I show it on my phone?
You should print the ETA and carry a physical copy with your passport. While some immigration officers may accept a digital copy on your phone, a printed version is the official requirement and avoids any issues at the checkpoint.
Can someone else fill out the form on my behalf?
Yes, a family member, travel agent, or any authorized person can fill out the form for you. However, the information must be accurate and match the applicant’s passport. The applicant is responsible for all information submitted.
What happens if my application is rejected?
If your e-Visa application is rejected, you can reapply. Common rejection reasons include poor-quality photo uploads, passport scan issues, or incomplete information. Address the specific issue noted in the rejection email before reapplying. You will need to pay the fee again.
Is the Indian visa application form free?
The form itself is free to fill out, but the visa processing requires a fee payment. The e-Tourist Visa starts at $25 for US citizens. The government does not charge any additional “service” or “expedited processing” fees.
Which is the official website for the Indian visa application form?
The only official website is indianvisaonline.gov.in, operated by the Government of India. Avoid third-party websites that may charge inflated fees or collect your personal data without delivering a valid visa.